Mini Cannoli Cups
Have you ever craved the crispy, creamy delight of cannoli but dreaded the fuss of frying shells? That’s where Mini Cannoli Cups come in—they’re my go-to solution for effortless indulgence. I remember the first time I whipped up these Mini Cannoli Cups for a family gathering; everyone raved about how they tasted just like the real thing from an Italian bakery, but without the hassle. In my experience, they’re perfect for parties or a sweet treat after dinner, and I’ll share exactly how to make your own Mini Cannoli Cups that will wow your crowd.
What I love most about Mini Cannoli Cups is their versatility; you can customize the filling to suit any occasion. They’re bite-sized, so no messy shells to deal with, and they come together in under an hour. Let’s be honest, who doesn’t want a dessert that’s both impressive and easy? I’m excited to guide you through this recipe, drawing from years of experimenting in the kitchen.
Key Takeaways:
- Mini Cannoli Cups offer all the classic cannoli flavor in a convenient, no-fry format that’s perfect for beginners.
- Prep and bake in just 30 minutes for quick dessert wins on busy days.
- Creamy ricotta filling bursts with chocolate and vanilla notes for an authentic Italian taste.
- Chill the filling overnight for even richer texture in your Mini Cannoli Cups.
- Store in the fridge for up to two days, making them ideal for make-ahead entertaining.
Why You’ll Adore This Mini Cannoli Cups
Effortless Elegance: These Mini Cannoli Cups look fancy enough for a dinner party but are surprisingly simple to assemble. I always feel like a pro baker when guests ooh and aah over them. Plus, skipping the deep-frying means less mess and more time enjoying the fruits of your labor.
Grab This Chef Knife Now - Almost Gone!

- Stays Razor-Sharp: Ice-hardened blade keeps its edge longer than ordinary knives
- Superior Grip Control: Unique finger hole design gives you perfect balance and safety
- Built to Last a Lifetime: Premium stainless steel blade with elegant beech wood handle
- ✓ Finally, a knife that stays sharp and feels comfortable in my hand
- ✓ Professional quality without the premium price tag
- ✓ Makes meal prep faster and more enjoyable
⏰ Only a few items left in stock - order soon
Party-Perfect Portions: Bite-sized and shareable, they’re a hit at gatherings—we’ve served them alongside charcuterie boards for a sweet-savory twist. Here’s the thing: they disappear fast, so make a double batch if you’re feeding a crowd. You’ll love how they elevate any spread without overwhelming your prep time.
Customizable Bliss: From chocolate chips to pistachios, the fillings in Mini Cannoli Cups let you play with flavors. In my experience, adding a hint of orange zest brings a fresh zing that’s unforgettable. It’s all about making them your own for that personal touch.
Guilt-Free Indulgence: Lighter than traditional cannoli, these cups satisfy sweet cravings without the heaviness. Now, you might be thinking they’re too good to be true, but trust me—they’re a healthier dessert that doesn’t skimp on taste. We can’t get enough of them around here!
Essential Ingredients for Mini Cannoli Cups
Wonton Wrappers: These thin, versatile sheets form the crisp “cups” that hold your creamy filling. They’re easy to work with and bake up golden without any oil splatters. In Mini Cannoli Cups, they mimic the traditional shell perfectly, providing that satisfying crunch we all crave. I always stock up on them for quick appetizers too.
Grab This Kitchen Scale Now — Best Precision Pick!

- Razor-Accurate Every Time: Dual-increment precision down to 0.1g — perfect for baking, meal prep, and portion control with g, oz, ml, and fl'oz modes.
- Smart Removable Bowl Design: Detachable bowl doubles as a protective case for compact storage. Tare function lets you weigh ingredients in any container with zero fuss.
- Built for Everyday Convenience: Auto-zero, tare function, low battery alert, overload indicator, and 2-minute auto-off to extend battery life — all in a sleek stainless steel build.
- ✓ "Perfect for baking — precise, lightweight, and stores easily without wasting counter space"
- ✓ "A game changer! Weighing ingredients is now way more accurate than measuring cups"
- ✓ "Love the 0.1g precision and backlight — best food scale I've owned. Highly recommend!"
⏰ Only a few items left in stock - order soon
Ricotta Cheese: The star of the filling, this creamy Italian cheese delivers the authentic cannoli texture. Drain it well to avoid a watery mix, and blend with sugar for smoothness. It’s what makes your Mini Cannoli Cups so lusciously rich yet light. Fresh is best—I’ve tried skim versions, but full-fat wins for flavor.
Mini Chocolate Chips: These little gems add bursts of sweetness and texture to every bite. Semi-sweet varieties balance the ricotta’s tang beautifully. In Mini Cannoli Cups, they melt slightly when filled warm, creating an irresistible gooey contrast. Don’t skip them; they’re the finishing touch that elevates the whole dessert.
How to Make Mini Cannoli Cups
Prepare the Shells
Start by preheating your oven to 375°F and lightly greasing a muffin tin— this ensures your Mini Cannoli Cups pop out easily. Press a wonton wrapper into each cup, tucking the edges gently to form a shell; I’ve found using a small glass helps shape them neatly. Brush lightly with melted butter for extra crispiness, then bake for 8-10 minutes until golden. The aroma alone will have you eager for the first bite. Once cooled, they’re ready to fill, transforming simple wrappers into Mini Cannoli Cups magic.
Mix the Filling
In a bowl, combine drained ricotta, powdered sugar, and vanilla extract, beating until creamy and lump-free—about 2 minutes with a hand mixer works wonders. Fold in half the mini chocolate chips for even distribution, tasting as you go to adjust sweetness. This step is key for that velvety texture in your Mini Cannoli Cups. Let it chill for 15 minutes to firm up, enhancing the flavors as it rests. The smooth consistency makes piping a breeze.
Assemble and Serve
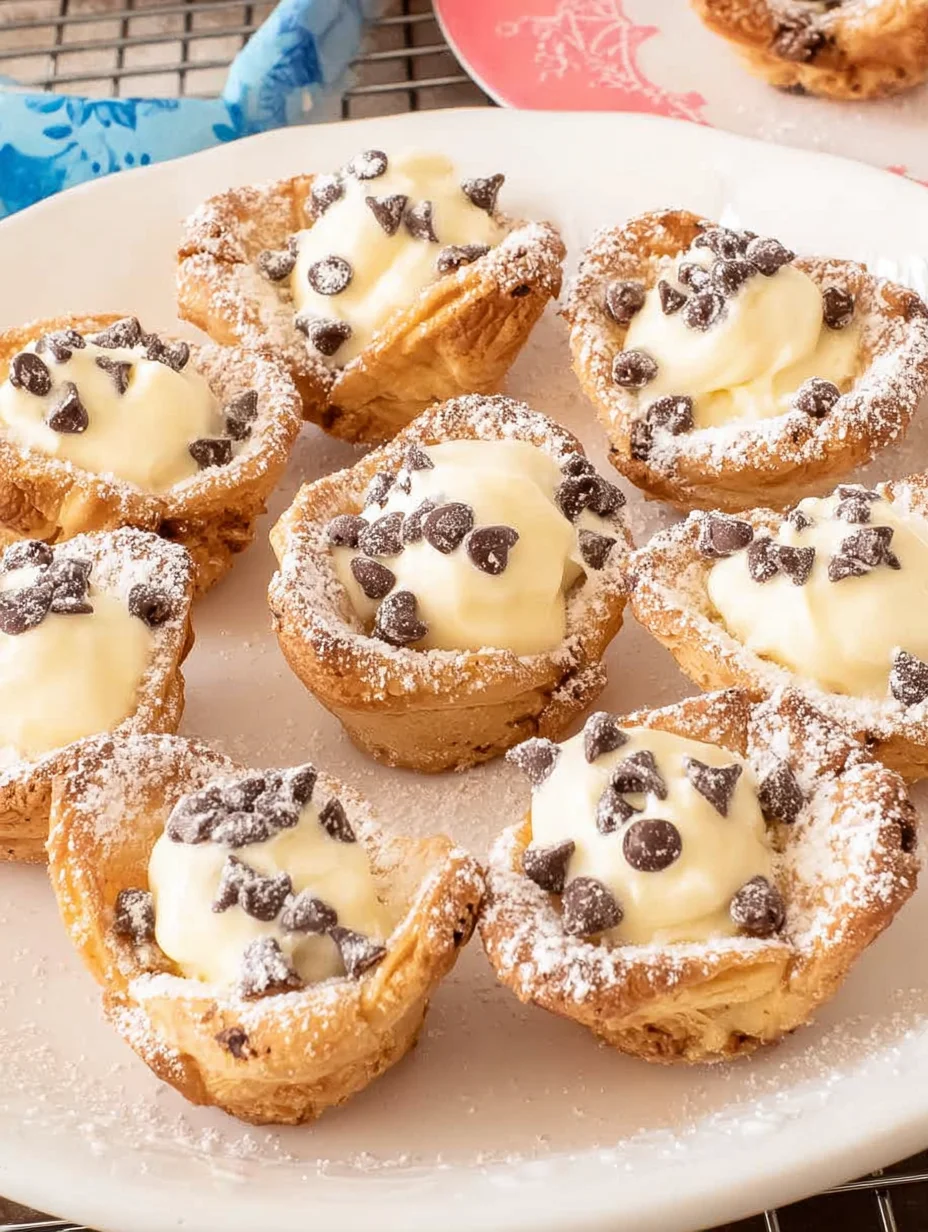
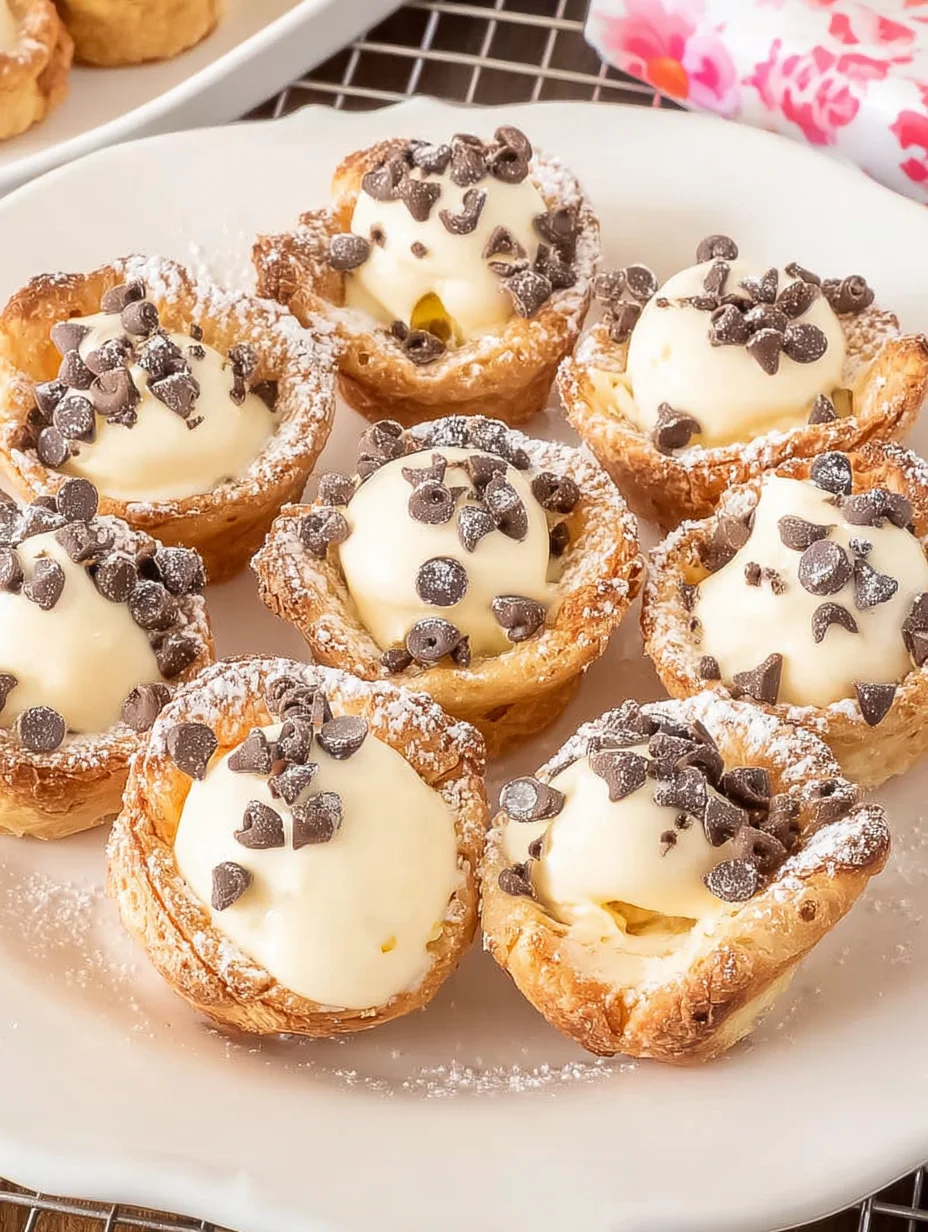
Spoon or pipe the chilled filling into the cooled shells, then sprinkle with remaining chocolate chips and a dusting of powdered sugar. For a pro look, garnish with chopped pistachios or citrus zest if desired. Your Mini Cannoli Cups are now complete—serve immediately to capture the crunch. If you’re like me, you’ll sneak one while plating. They pair wonderfully with coffee, much like in an Italian café.
Ingredients
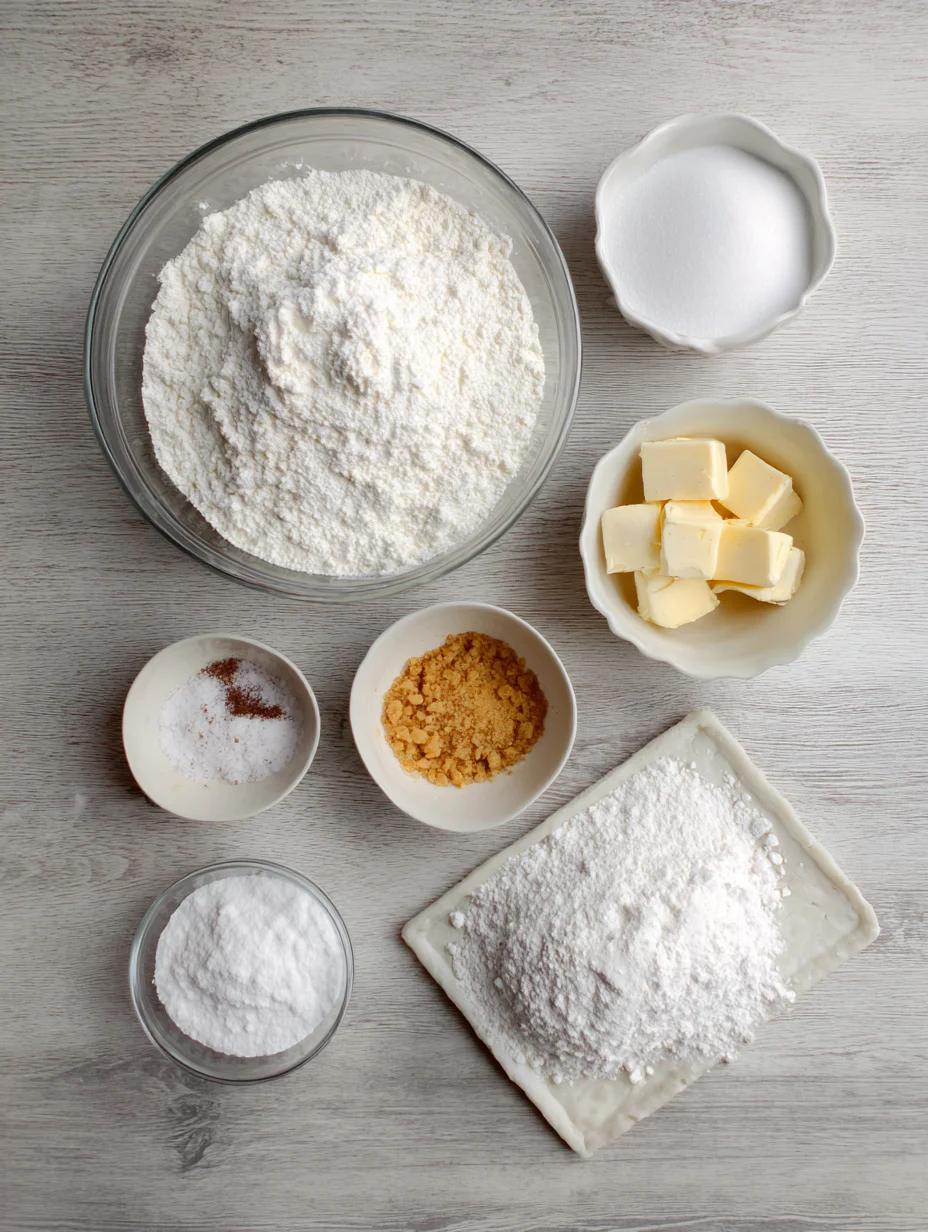
- 24 wonton wrappers
- 1 cup whole milk ricotta cheese, drained
- 1/2 cup powdered sugar
- 1 teaspoon vanilla extract
- 1/2 cup mini semi-sweet chocolate chips, divided
- 2 tablespoons unsalted butter, melted (for brushing)
- Optional: Chopped pistachios or candied orange peel for garnish
Mini Cannoli Cups Instructions
- Preheat oven to 375°F (190°C). Grease a 12-cup muffin tin. Press wonton wrappers into each cup, forming shell shapes, and brush lightly with melted butter.
- Bake for 8-10 minutes until golden and crisp. Remove from oven and let cool in the tin for 5 minutes, then transfer to a wire rack.
- Meanwhile, in a medium bowl, beat ricotta, powdered sugar, and vanilla until smooth. Fold in 1/4 cup chocolate chips. Chill for 15 minutes.
- Fill each cooled shell with the ricotta mixture using a spoon or piping bag. Top with remaining chocolate chips and powdered sugar.
- Serve immediately. Makes 24 Mini Cannoli Cups.
Pro Tips for the Best Mini Cannoli Cups
Drain the Ricotta Thoroughly: Place it in cheesecloth overnight to remove excess moisture—this prevents soggy Mini Cannoli Cups.
Don’t Overfill: A generous tablespoon per cup keeps the crunch intact; too much filling leads to heartbreak when shells break.
Experiment with Flavors: Add a splash of almond extract or espresso powder to the filling for a gourmet twist on your Mini Cannoli Cups.
You Must Know
- Mini Cannoli Cups are best eaten fresh, as the shells soften over time with filling.
- Use full-fat ricotta for the creamiest texture; low-fat versions can make the filling grainy.
- Wonton wrappers are found in the produce or freezer section of most grocery stores.
- These are naturally vegetarian but can be made vegan with plant-based ricotta substitutes.
How to Store Mini Cannoli Cups
To keep your Mini Cannoli Cups fresh, store unfilled shells in an airtight container at room temperature for up to two days. Once filled, refrigerate them in a single layer covered with plastic wrap for no more than 24 hours to maintain crispness. If needed, reheat briefly in a 350°F oven for 2-3 minutes to revive the crunch—I’ve done this for parties and it works like a charm.
Customizing Your Mini Cannoli Cups
Swap chocolate chips for white chocolate or hazelnuts to vary the flavor profile in your Mini Cannoli Cups. For a fruity twist, mix in dried cranberries or lemon zest—it’s a refreshing change from the classic. If you’re watching calories, try Greek yogurt blended with ricotta for a lighter filling. Check out this charcuterie wreath recipe for more party inspo with sweet elements.
What to Serve with Mini Cannoli Cups
Pair these delightful Mini Cannoli Cups with a strong espresso or cappuccino to cut through the sweetness. For a full dessert spread, add fresh berries or a scoop of gelato on the side. They’re also wonderful after a hearty meal like roasted potatoes—try our garlic herb roasted potatoes for an Italian-inspired dinner. A glass of Marsala wine complements the flavors beautifully, making any gathering feel festive.

Mini Cannoli Cups
Be the star of any party or get-together with these amazingly easy and delicious Mini Cannoli Cups! A real crowd-pleaser!
Timing
Recipe Details
Ingredients
- 01 1 container whole-milk ricotta cheese (15 oz., drained)
- 02 1/2 cup powdered sugar
- 03 2 tablespoon granulated sugar
- 04 1 teaspoon finely grated orange or lemon zest
- 05 1/2 teaspoon vanilla extract
- 06 1 box refrigerated pie crusts, softened as directed on box (2 count)
- 07 3 tablespoon turbinado sugar (raw sugar)
- 08 1 teaspoon ground cinnamon
- 09 1/4 cup miniature semisweet chocolate chips or finely chopped pistachios
- 10 additional powdered sugar
Instructions
Preheat the oven to 425°F.
Lightly flour a work surface and unroll the pie crusts. Sprinkle both of the pie crusts with turbinado sugar and cinnamon. Gently roll a rolling pin over the top of the pie crusts to press the sugar and cinnamon into the dough. With a 2½-inch round cookie/biscuit cutter, cut out pastry rounds. Gently press each pastry round into ungreased mini muffin cups. (Note, you may need to gently re-roll the pie crusts and cut out more circles until you have 48 circles.)
Bake the crusts for 10 minutes, or until golden brown. Allow cannoli cups to cool completely in the pans, about 15 minutes, before removing them to a wire rack to cool completely.
While the cups are cooling, prepare the filling by beating all of the filling ingredients with an electric mixer on medium speed in a large mixing bowl until creamy. Place the filling in a 1-gallon zip-top resealable bag. Seal bag. Refrigerate until ready to serve.
Just before serving, remove the filling from the refrigerator. Snip one corner off of the bag and pipe approximately 1 tablespoon of filling into the cooled pastry cups. Sprinkle cups with mini chocolate chips or chopped pistachios. Dust with powdered sugar.
Serve immediately.
FILED UNDER:
NUTRITION FACTS (PER SERVING)
Nutrition information is calculated using an ingredient database and should be considered an estimate. In cases where multiple ingredient alternatives are given, the first listed is calculated for nutrition. Garnishes and optional ingredients are not included.
Frequently Asked Questions About Mini Cannoli Cups
Can I make Mini Cannoli Cups ahead of time?
Yes, bake the shells up to two days in advance and store them airtight. Prepare the filling a day ahead, then assemble just before serving to keep them crisp. This make-ahead approach has saved me during busy holidays.
How long does Mini Cannoli Cups last in the fridge?
Filled Mini Cannoli Cups stay fresh for up to 24 hours in the fridge, covered loosely to avoid sogginess. Beyond that, the shells soften, so enjoy them promptly. I’ve found refrigerating unfilled ones extends their life longer.
Are Mini Cannoli Cups gluten-free?
Not with standard wonton wrappers, but you can swap for gluten-free versions available at health stores. The filling is naturally gluten-free, so it’s an easy adaptation. Always check labels to be sure.
Can I freeze Mini Cannoli Cups?
Freezing isn’t ideal as the shells lose crispness upon thawing, but you can freeze unfilled ones for up to a month. Re-bake briefly after thawing. For the best your Mini Cannoli Cups, make them fresh—it’s worth the effort.
What if I can’t find wonton wrappers?
Phyllo dough cut into squares works as a substitute, baked similarly. It gives a flakier texture to Mini Cannoli Cups. Experiment, but wontons are the easiest for that classic crunch.
How do I prevent soggy Mini Cannoli Cups?
Fill right before serving and ensure ricotta is well-drained. Store components separately if needed. In my experience, a quick chill for the filling helps it hold shape better.
Can kids help make Mini Cannoli Cups?
Absolutely—the shell pressing and filling are fun, hands-on tasks. Supervise the oven part, but it’s a great family activity. They’ll love customizing their own creations.
What’s the calorie count for Mini Cannoli Cups?
Each cup is about 80-100 calories, depending on fillings. They’re lighter than fried cannoli, making them a smarter sweet option. Track ingredients for precision if dieting.
Final Thoughts
There’s something truly magical about sharing Mini Cannoli Cups—their crispy shells and dreamy filling bring joy to every bite, just like Nonna’s originals but with modern ease. I hope this recipe inspires you to create your own batch, whether for a cozy night in or a big celebration. Give it a try this weekend; you won’t regret it—tag me in your photos if you do!