Deviled Strawberries (Made with a Cheesecake Filling)
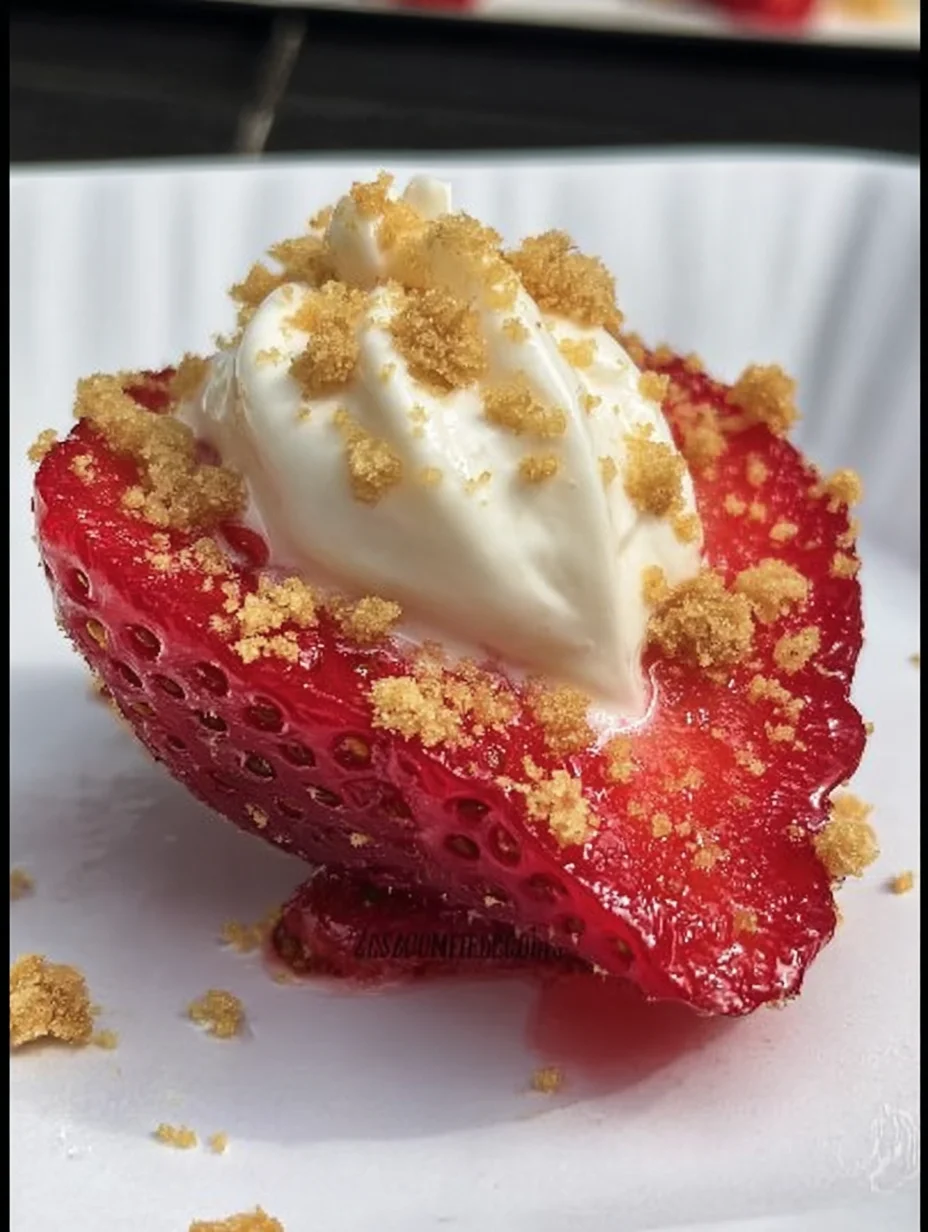
Have you ever thought about taking fresh, juicy strawberries and giving them a devilish twist? That’s exactly what Deviled Strawberries are all about—a delightful treat that combines the sweetness of summer berries with a creamy, indulgent filling. I remember the first time I made Deviled Strawberries for a backyard gathering; everyone was hooked after just one bite. It’s one of those simple recipes that feels fancy without much effort, perfect for impressing guests or satisfying a sweet craving on a whim.
What I love most about Deviled Strawberries is how they bridge the gap between healthy snacking and decadent dessert. In my experience, they’re a hit at parties because they’re portable, visually stunning, and incredibly easy to prepare. I’ve tweaked this recipe over the years to make it my go-to for any occasion, and now I’m excited to share it with you so you can create your own batch of these irresistible Deviled Strawberries.
Key Takeaways:
- Deviled Strawberries offer a unique blend of fresh fruit and creamy filling for a guilt-free indulgence.
- Prep time is under 20 minutes, making them ideal for quick desserts.
- The burst of flavors from tangy cream cheese and sweet strawberries creates an unforgettable taste.
- Use room-temperature ingredients for the smoothest filling texture.
- Store in the fridge for up to two days to keep Deviled Strawberries fresh.
Why You’ll Adore This Deviled Strawberries
Quick and Effortless Preparation: Let’s be honest, who has time for complicated desserts on busy days? This Deviled Strawberries recipe comes together in minutes, allowing you to whip up something special without spending hours in the kitchen. I’ve found it’s perfect for when you need a last-minute treat that still wows.
Grab This Chef Knife Now - Almost Gone!

- Stays Razor-Sharp: Ice-hardened blade keeps its edge longer than ordinary knives
- Superior Grip Control: Unique finger hole design gives you perfect balance and safety
- Built to Last a Lifetime: Premium stainless steel blade with elegant beech wood handle
- ✓ Finally, a knife that stays sharp and feels comfortable in my hand
- ✓ Professional quality without the premium price tag
- ✓ Makes meal prep faster and more enjoyable
⏰ Only a few items left in stock - order soon
Versatile for Any Occasion: Whether it’s a summer picnic or a holiday party, these little gems fit right in. Their vibrant red color and creamy tops make them as pretty as they are delicious. You might be thinking they’re just for kids, but trust me, adults go crazy for Deviled Strawberries too.
Healthier Twist on Classics: Unlike heavy cakes, Deviled Strawberries incorporate fresh fruit for a lighter option that doesn’t skimp on flavor. The natural sweetness of the berries shines through, balanced by a not-too-sweet filling. In my experience, they’re a crowd-pleaser that sneaks in some fruit without feeling forced.
Customizable to Your Taste: Here’s the thing—you can play around with toppings and fillings to make them your own. From nuts to chocolate drizzles, the possibilities are endless and fun. I always encourage experimenting because it turns simple Deviled Strawberries into personalized delights.
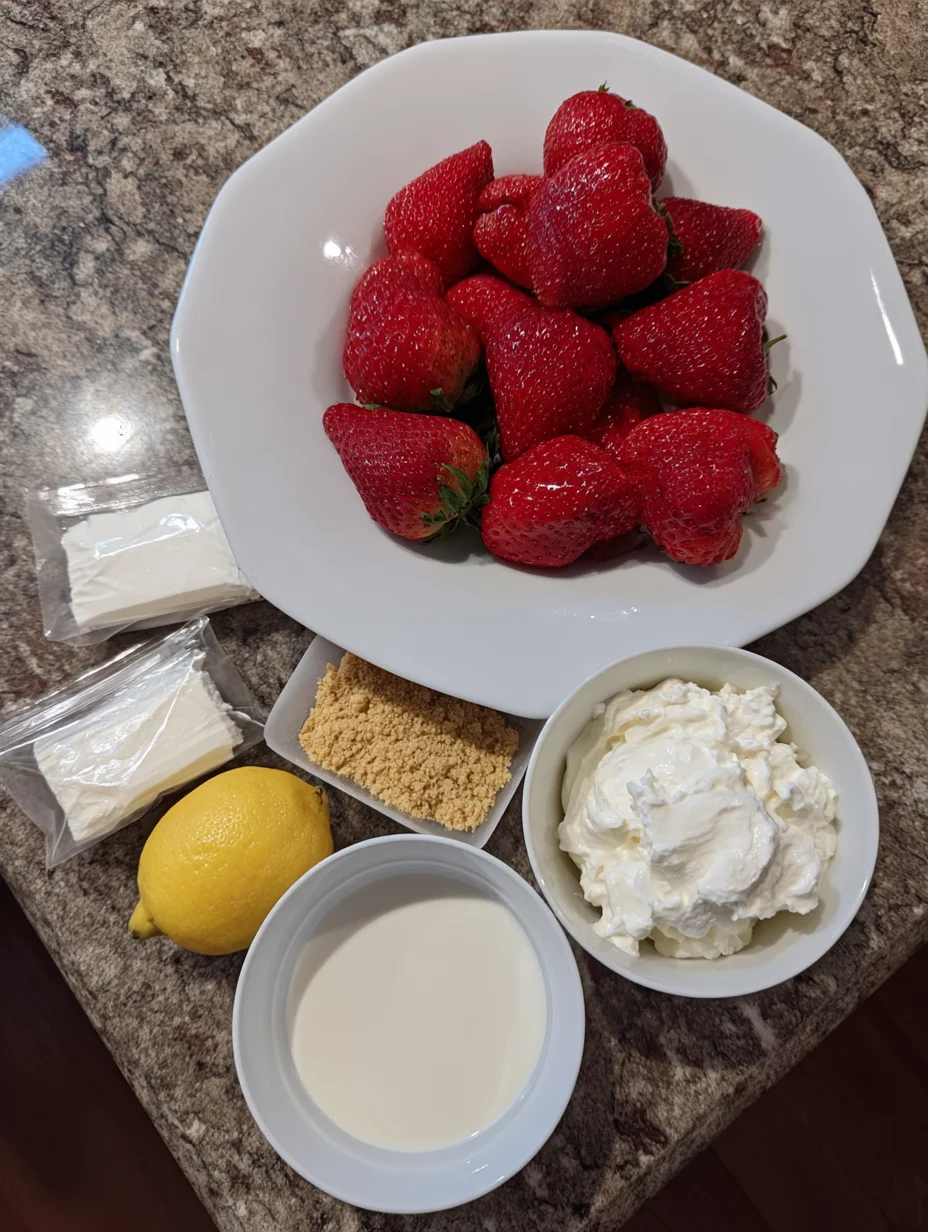
Essential Ingredients for Deviled Strawberries
Fresh Strawberries: These are the star of your Deviled Strawberries, providing that juicy, vibrant base. I always choose large, firm strawberries for easier hollowing out—they hold their shape better and look more impressive on a platter. In season, they burst with natural sweetness that pairs perfectly with the creamy filling, elevating the whole treat to something truly special.
Grab This Kitchen Scale Now — Best Precision Pick!

- Razor-Accurate Every Time: Dual-increment precision down to 0.1g — perfect for baking, meal prep, and portion control with g, oz, ml, and fl'oz modes.
- Smart Removable Bowl Design: Detachable bowl doubles as a protective case for compact storage. Tare function lets you weigh ingredients in any container with zero fuss.
- Built for Everyday Convenience: Auto-zero, tare function, low battery alert, overload indicator, and 2-minute auto-off to extend battery life — all in a sleek stainless steel build.
- ✓ "Perfect for baking — precise, lightweight, and stores easily without wasting counter space"
- ✓ "A game changer! Weighing ingredients is now way more accurate than measuring cups"
- ✓ "Love the 0.1g precision and backlight — best food scale I've owned. Highly recommend!"
⏰ Only a few items left in stock - order soon
Cream Cheese: Softened to room temperature, cream cheese forms the rich, tangy core of the filling. It blends smoothly with other ingredients, creating a luscious texture that’s not overly heavy. I’ve learned that full-fat versions give the best flavor, but you can opt for lighter if you’re watching calories without sacrificing much.
Powdered Sugar and Vanilla Extract: Powdered sugar adds just the right sweetness to balance the tartness, while vanilla extract brings a warm, aromatic note. Together, they transform basic ingredients into a sophisticated filling for Deviled Strawberries. Don’t skip the vanilla—it’s what makes the taste pop and feel homemade.
How to Make Deviled Strawberries
Prepare the Strawberries
Start by washing your strawberries under cool water and patting them dry gently with a paper towel to avoid excess moisture. Using a small paring knife, carefully hull each one by cutting off the green top and scooping out a bit of the center to create space for the filling—this is where the magic of Deviled Strawberries begins. I find it helpful to slice a thin piece off the bottom so they stand upright like little cups. Arrange them on a serving platter as you go to keep things organized and pretty.
Mix the Creamy Filling
In a medium bowl, beat the softened cream cheese with an electric mixer until it’s fluffy and smooth, which takes about a minute. Gradually add the powdered sugar and vanilla extract, mixing until everything combines into a velvety mixture—it’s this step that gives Deviled Strawberries their signature indulgence. Taste and adjust sweetness if needed; I usually add a touch more vanilla for depth. The aroma alone will have you eager to assemble.
Fill and Garnish
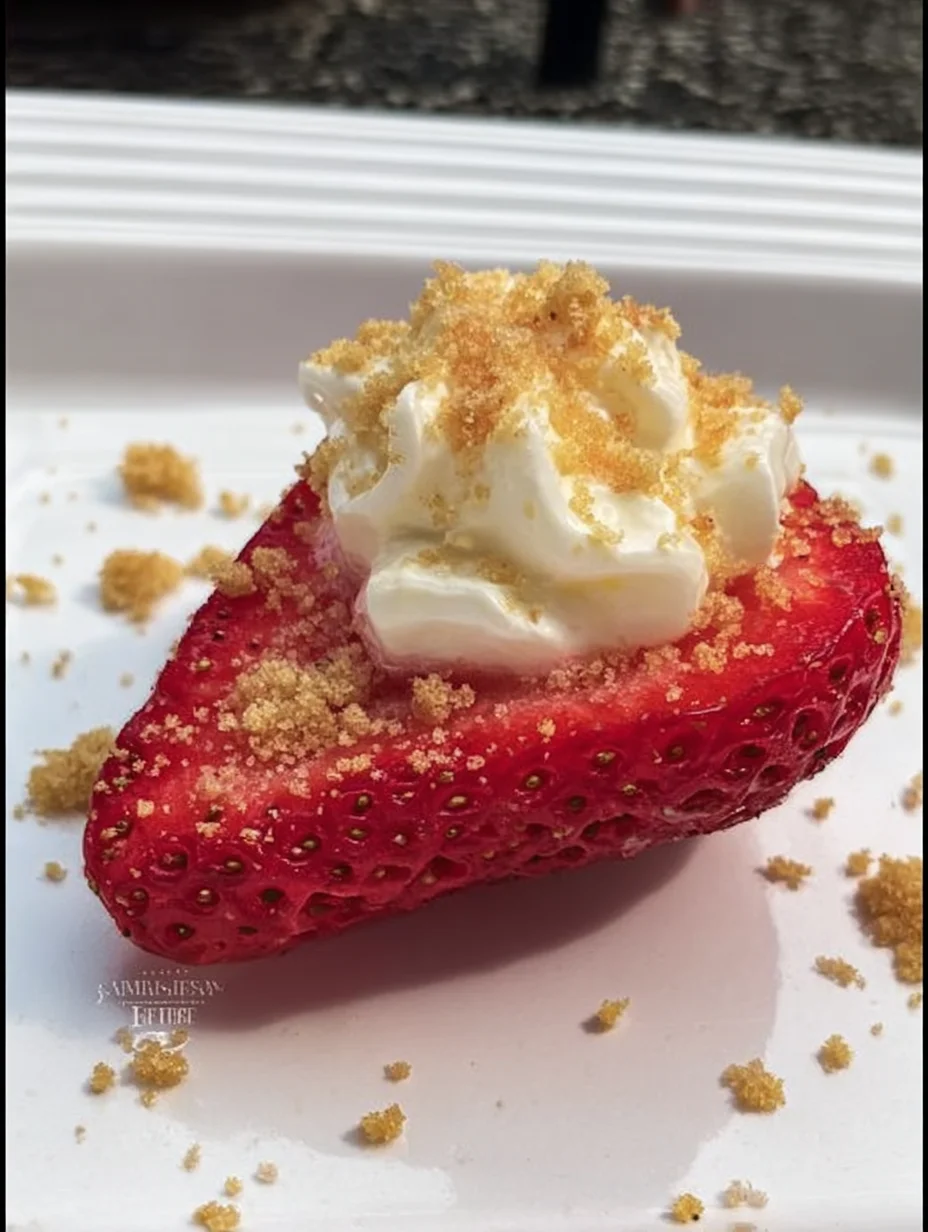
Spoon or pipe the filling into each hollowed strawberry, filling generously but neatly for an appealing look. For that extra flair, top with crushed graham crackers, chopped nuts, or even a drizzle of melted chocolate—whatever suits your Deviled Strawberries vibe. Chill them in the fridge for 15-20 minutes to set, enhancing the flavors. Serve fresh for the best texture and enjoy the compliments rolling in.
Ingredients
- 1 pint fresh large strawberries (about 20-24)
- 8 oz cream cheese, softened
- 1/4 cup powdered sugar
- 1 tsp vanilla extract
- Optional toppings: crushed graham crackers, mini chocolate chips, or chopped pistachios
Deviled Strawberries Instructions
- Wash and dry strawberries. Hull and hollow out the centers, then slice bottoms if needed for stability.
- Beat cream cheese until smooth. Mix in powdered sugar and vanilla.
- Fill strawberries with the mixture. Top as desired and chill for 15-20 minutes before serving.
Pro Tips for the Best Deviled Strawberries
Choose Ripe but Firm Berries: Opt for strawberries that are bright red and firm to avoid mushiness when filling your Deviled Strawberries.
Room Temperature Filling: Let cream cheese soften fully for a lump-free mixture that pipes easily into the berries.
Chill Before Serving: A quick fridge stint helps the flavors meld and keeps Deviled Strawberries looking pristine.
You Must Know
- Deviled Strawberries are best enjoyed fresh, as the filling can soften over time.
- This recipe yields about 20-24 pieces, perfect for a small gathering.
- No baking required—it’s all about no-cook simplicity.
- Allergies? Swap cream cheese for a dairy-free alternative easily.
How to Store Deviled Strawberries
To keep your Deviled Strawberries tasting fresh, store them in an airtight container in the fridge, where they’ll last up to two days. Avoid stacking to prevent the filling from smearing, and if needed, cover loosely with plastic wrap. For longer storage, freeze the unfilled berries and make the filling fresh, but I recommend enjoying them soon after preparation for peak flavor and texture.
Customizing Your Deviled Strawberries
Feel free to swap in Greek yogurt for a tangier, lighter filling in your Deviled Strawberries, or add lemon zest for a citrus kick. For a chocolate version, mix in cocoa powder—it’s divine and reminiscent of strawberry chocolate cake. Experiment with seasonal berries like raspberries if strawberries are out of season, keeping the core method the same for endless variations.
What to Serve with Deviled Strawberries
Pair these treats with a charcuterie board featuring cheeses and crackers for a balanced sweet-savory spread. For drinks, a sparkling rosé or iced herbal tea complements the berry freshness beautifully. If you’re hosting a dessert table, add some shortbread cookies or fresh whipped cream on the side to round out the offerings.

Deviled Strawberries (Made with a Cheesecake Filling)
These deviled strawberries are quick and simple to make with just a few ingredients! They are filled with a cream cheese filling that tastes just like strawberry cheesecake but in the form of finger food. They are perfect for parties, birthdays, potlucks, 4th of July, and more.
Timing
Recipe Details
Ingredients
- 01 18-24 large strawberries
- 02 1 cup heavy whipping cream
- 03 1 package cream cheese ((8 ounce, softened))
- 04 1/3 cup sour cream
- 05 2/3 cup white granulated sugar
- 06 1 tsp vanilla extract
- 07 1 tbsp fresh lemon juice ((optional))
- 08 1/2 cup graham cracker crumbs
Instructions
Prep the strawberries by cutting off the stems and slicing them in half. Next, cut a small sliver off of the back of each strawberry half so that they sit up straight. Use a small melon baller to carefully hollow out the middle (you don't need to take out much, just make a small enough indent so that the cream cheese filling doesn't slide off). *Pictorial Above *
In a medium sized mixing bowl, beat the whipping cream until stiff peaks form (about 5 minutes).
In a separate bowl, mix together the softened cream cheese, sour cream, sugar, vanilla extract, and lemon juice with an electric mixer until smooth.
Fold the whipped cream into the cream cheese mixture until well incorporated.
Fill a piping bag with the cream cheese mixture (I used a star tip), and pipe it onto each sliced strawberry.
Finish with a sprinkle of graham cracker crumbs.
Serve and enjoy!
FILED UNDER:
NUTRITION FACTS (PER SERVING)
Nutrition information is calculated using an ingredient database and should be considered an estimate. In cases where multiple ingredient alternatives are given, the first listed is calculated for nutrition. Garnishes and optional ingredients are not included.
Frequently Asked Questions About Deviled Strawberries
Can I make Deviled Strawberries ahead of time?
Yes, you can prepare the filling a day in advance and store it in the fridge. Assemble the Deviled Strawberries just before serving to keep the berries crisp. This way, they stay fresh and delicious without losing their appeal.
How long does Deviled Strawberries last in the fridge?
Deviled Strawberries keep well in the refrigerator for up to 48 hours in an airtight container. Beyond that, the berries may soften, but they’re still safe to eat. Always check for any spoilage before consuming.
Are Deviled Strawberries gluten-free?
Absolutely, the basic recipe is naturally gluten-free since it uses no flour or grains. If adding toppings like graham crackers, choose gluten-free versions to maintain that status. It’s a great option for dietary restrictions.
Can I use frozen strawberries for Deviled Strawberries?
I don’t recommend frozen strawberries for Deviled Strawberries, as they become too watery when thawed, affecting the texture. Stick to fresh ones for the best results and crunch. If in a pinch, thaw and pat dry thoroughly, but fresh is ideal.
What if I don’t have a piping bag for Deviled Strawberries?
No worries—use a zip-top bag with the corner snipped off as a makeshift piping bag for filling your Deviled Strawberries. A spoon works too, though it might be messier. The key is even distribution for pretty presentation.
How can I make Deviled Strawberries vegan?
Easily swap the cream cheese for a plant-based alternative like cashew cream or vegan cream cheese, and use maple syrup instead of powdered sugar if needed. Your Deviled Strawberries will still be creamy and delicious without any dairy.
Why are my Deviled Strawberries watery?
This usually happens if the strawberries aren’t dried well after washing. Pat them thoroughly and let them air dry a bit before filling. Chilling also helps absorb any excess moisture for firmer Deviled Strawberries.
Can kids help make Deviled Strawberries?
Definitely—hulling strawberries and spooning filling is fun and easy for little ones. Supervise with the knife, and turn it into a family activity. It’s a sweet way to get them excited about cooking.
Final Thoughts
There’s something truly magical about how Deviled Strawberries turn everyday ingredients into a showstopper dessert that’s both simple and sophisticated. I’ve shared this recipe with friends and family, and it always brings smiles and seconds. Give these Deviled Strawberries a try next time you’re in the mood for something sweet—you won’t be disappointed. Head to the kitchen and start creating!