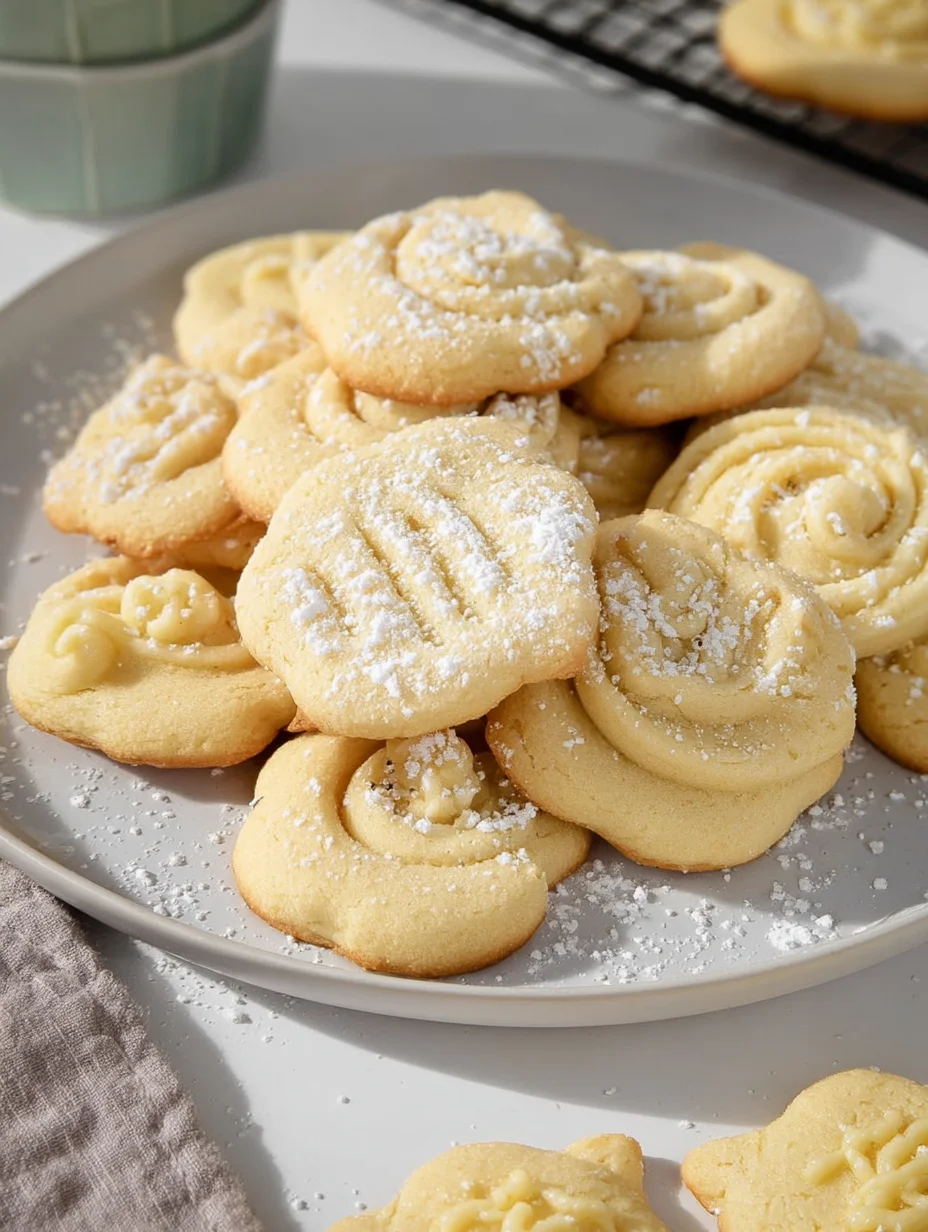
Danish Butter Cookies (Melt in your mouth)

There’s something magical about the holidays that always brings me back to the kitchen, rolling up my sleeves to bake batches of Danish Butter Cookies. These delicate, buttery treats have been a staple in my family for years, evoking memories of cozy evenings with tea and laughter. If you’ve ever wondered how to capture that perfect melt-in-your-mouth texture, you’re in for a treat—I’ll share my go-to recipe for homemade Danish Butter Cookies that rivals any bakery.
What I love most about making Danish Butter Cookies is how simple they are, yet they always impress. In my experience, the key is using high-quality butter; it really shines through in every bite. Whether you’re prepping for a festive gathering or just craving a sweet escape, these cookies come together effortlessly. Let’s dive into this recipe and get you baking your own Danish Butter Cookies today!
Key Takeaways:
- These Danish Butter Cookies offer a classic Scandinavian flavor with a rich, buttery taste that’s perfect for any occasion.
- Prep and bake in under an hour for quick, stress-free homemade treats.
- Expect a tender, crumbly texture with subtle sweetness that pairs beautifully with coffee.
- Chill the dough briefly for the best shape and even baking results.
- Store in an airtight container to keep your Danish Butter Cookies fresh for up to two weeks.
Why You’ll Adore This Danish Butter Cookies
Timeless Tradition Meets Modern Ease: Nothing beats the nostalgia of Danish Butter Cookies during the holidays, but this recipe simplifies the process so you can enjoy them year-round. I’ve found that even beginner bakers nail the flaky layers on the first try. It’s all about that pure butter indulgence without the fuss.
Grab This Chef Knife Now - Almost Gone!

- Stays Razor-Sharp: Ice-hardened blade keeps its edge longer than ordinary knives
- Superior Grip Control: Unique finger hole design gives you perfect balance and safety
- Built to Last a Lifetime: Premium stainless steel blade with elegant beech wood handle
- ✓ Finally, a knife that stays sharp and feels comfortable in my hand
- ✓ Professional quality without the premium price tag
- ✓ Makes meal prep faster and more enjoyable
⏰ Only a few items left in stock - order soon
Irresistible Buttery Flavor: These cookies burst with the rich essence of high-quality butter, creating a melt-in-your-mouth experience that’s simply divine. What I find interesting is how just a few ingredients transform into something so elegant and satisfying. You’ll be hooked after one batch!
Versatile for Any Gathering: Whether it’s a tea party or a casual snack, Danish Butter Cookies fit right in with their subtle sweetness. In my experience, adding a sprinkle of sugar on top elevates them for guests. They’re the kind of treat that makes everyone ask for seconds.
Healthier Indulgence Option: Made with simple, real ingredients, these cookies feel like a guilty pleasure without the guilt. Let’s be honest, baking them at home means you control the quality—no preservatives here. It’s a delightful way to treat yourself warmly and enthusiastically.
Essential Ingredients for Danish Butter Cookies
Unsalted Butter: The star of these Danish Butter Cookies, high-quality unsalted butter provides the rich, creamy base that gives them their signature melt-in-your-mouth texture. I always opt for European-style butter for extra flavor and tenderness. Chilling it slightly before use ensures it creams perfectly with the sugar, creating air pockets for lightness. Without it, your Danish Butter Cookies just wouldn’t be the same.
Grab This Kitchen Scale Now — Best Precision Pick!

- Razor-Accurate Every Time: Dual-increment precision down to 0.1g — perfect for baking, meal prep, and portion control with g, oz, ml, and fl'oz modes.
- Smart Removable Bowl Design: Detachable bowl doubles as a protective case for compact storage. Tare function lets you weigh ingredients in any container with zero fuss.
- Built for Everyday Convenience: Auto-zero, tare function, low battery alert, overload indicator, and 2-minute auto-off to extend battery life — all in a sleek stainless steel build.
- ✓ "Perfect for baking — precise, lightweight, and stores easily without wasting counter space"
- ✓ "A game changer! Weighing ingredients is now way more accurate than measuring cups"
- ✓ "Love the 0.1g precision and backlight — best food scale I've owned. Highly recommend!"
⏰ Only a few items left in stock - order soon
Granulated Sugar: This adds just the right amount of sweetness to balance the butter’s richness in Danish Butter Cookies. It helps with browning during baking, giving them that golden hue we all love. In my experience, pulsing it briefly in a food processor yields finer grains for smoother dough. It’s essential for achieving even sweetness throughout every bite.
All-Purpose Flour: The backbone of the dough, all-purpose flour brings structure to Danish Butter Cookies without making them tough. Sifted for lightness, it absorbs the butter and eggs to form a pliable mixture that’s easy to pipe or shape. What I find interesting is how it contributes to the crumbly yet tender consistency that defines these classics. Always measure it properly to avoid dense results.
How to Make Danish Butter Cookies
Prepare the Dough
Start by beating the softened butter and sugar together until light and fluffy—this is crucial for incorporating air into your Danish Butter Cookies, ensuring they’re tender. Add the egg yolk and vanilla extract, mixing just until combined to avoid overworking the fat. In my experience, this step takes about 3-4 minutes with an electric mixer, and you’ll notice the mixture turn pale and creamy. Gradually incorporate the flour to form a soft dough that holds its shape when piped.
Shape and Chill
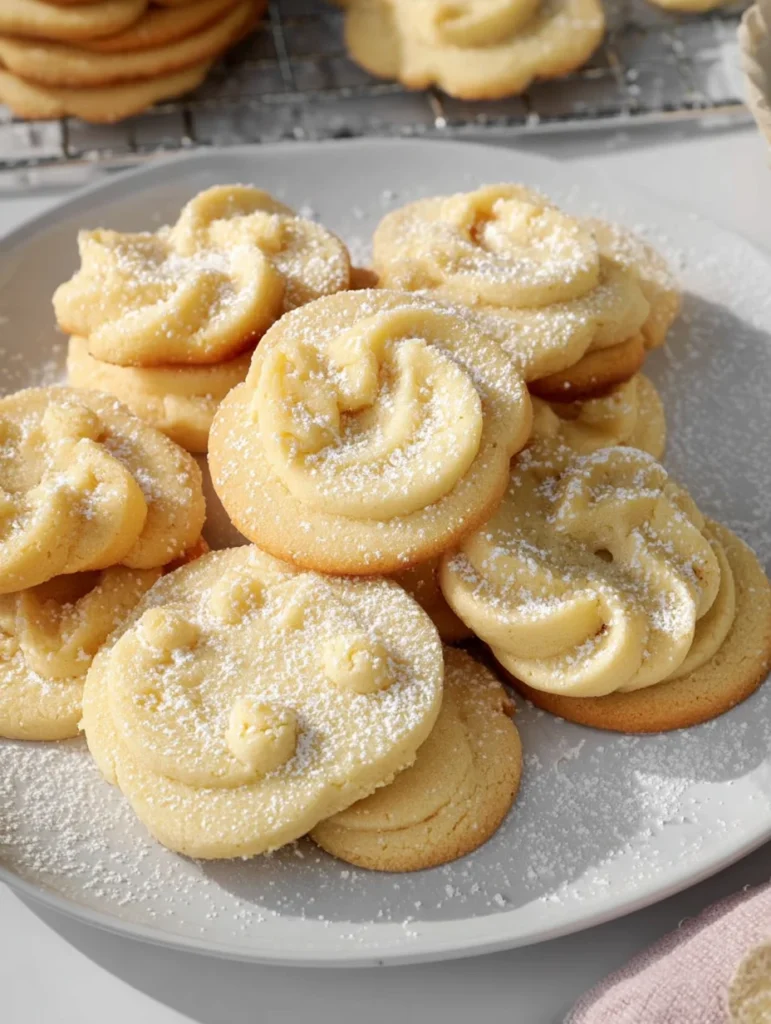
Transfer the dough to a piping bag fitted with a large star tip, then pipe small rosettes onto a parchment-lined baking sheet for that authentic look. If the dough feels too soft, chill it for 15-20 minutes to firm up, which helps the Danish Butter Cookies hold their shape during baking. I love how this method gives them a professional swirl without much effort—space them about 2 inches apart. The subtle aroma of vanilla will start filling your kitchen, building anticipation.
Bake to Golden Perfection
Preheat your oven to 350°F and bake the cookies for 10-12 minutes, until the edges are lightly golden but the centers remain pale—this prevents over-browning your Danish Butter Cookies. Remove from the oven and let them cool on the sheet for a few minutes before transferring to a wire rack. The sensory payoff is incredible: that crisp snap followed by buttery softness. For extra flair, sprinkle with pearl sugar before baking; it’s a game-changer I’ve picked up over years of perfecting these treats.
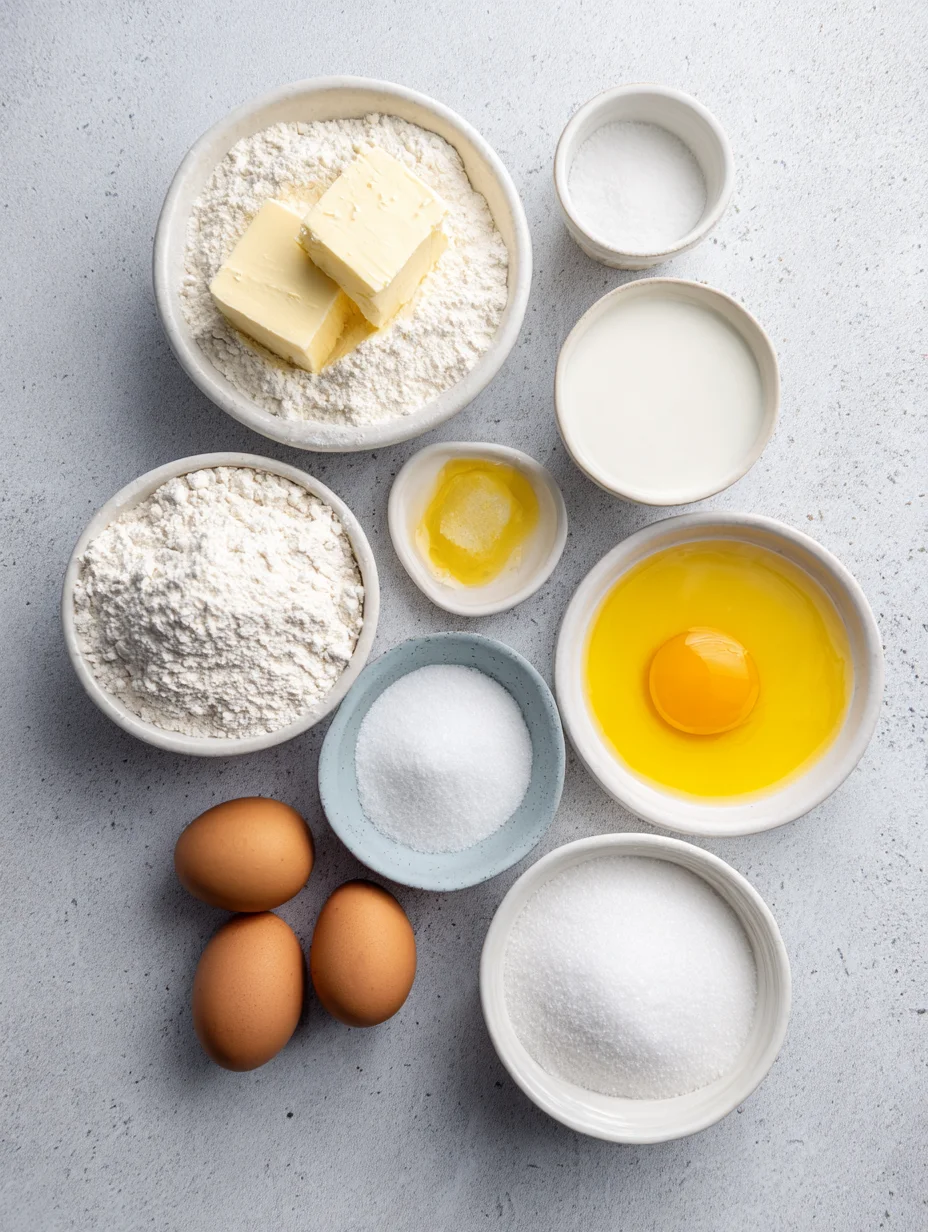
Ingredients
- 1 cup (2 sticks) unsalted butter, softened
- 1/2 cup granulated sugar
- 1 large egg yolk
- 1 teaspoon vanilla extract
- 2 cups all-purpose flour
- 1/4 teaspoon salt
- Pearl sugar for sprinkling (optional)
Danish Butter Cookies Instructions
- Preheat oven to 350°F and line baking sheets with parchment paper.
- Cream butter and sugar until light and fluffy, about 3 minutes.
- Beat in egg yolk and vanilla until smooth.
- Gradually add flour and salt, mixing to form dough.
- Pipe dough into small swirls on the sheet; chill if needed.
- Bake 10-12 minutes until edges are golden. Cool completely.
Pro Tips for the Best Danish Butter Cookies
Room Temperature Butter: Always use butter at room temp for even creaming—it prevents lumps and ensures your Danish Butter Cookies bake uniformly.
Piping Technique: If piping feels tricky, practice on a plate first; this helps build confidence for perfect shapes.
Don’t Overbake: Pull them out when just golden for that ideal soft center—overbaking leads to dryness.
You Must Know
- Danish Butter Cookies are traditionally piped for their iconic shape, originating from Danish baking heritage.
- High butter content means they’re best enjoyed fresh, but freezing dough works well for ahead prep.
- These cookies are naturally gluten-friendly if adjusted, but standard flour gives the classic crumb.
- A touch of almond extract can enhance the flavor for an authentic twist.
How to Store Danish Butter Cookies
To keep your Danish Butter Cookies fresh, store them in an airtight container at room temperature for up to two weeks—they actually taste better after a day as flavors meld. For longer storage, freeze in a single layer then transfer to a bag; they’ll last up to three months. If you need to refresh, a quick warm in a 300°F oven for 2-3 minutes revives the crispness without softening. In my experience, this method preserves that buttery goodness perfectly.
Customizing Your Danish Butter Cookies
Feel free to swap in brown sugar for a caramel note, or add a dash of almond extract to your Danish Butter Cookies for extra depth—I’ve tried both and love the variations. For gluten-free options, use a 1:1 flour blend; it works seamlessly in this recipe. If you’re feeling adventurous, dip cooled cookies in melted chocolate for a decadent twist, similar to our homemade choco tacos recipe. These tweaks keep things exciting while staying true to the classic.
What to Serve with Danish Butter Cookies
Pair your Danish Butter Cookies with a hot cup of Earl Grey tea for a sophisticated afternoon snack—the bergamot notes complement the buttery sweetness beautifully. For dessert, serve alongside fresh berries and whipped cream to add a fruity contrast. During holidays, they’re perfect with mulled wine or spiced cider, enhancing the cozy vibe. Don’t overlook vanilla ice cream; scooping it between two cookies makes irresistible sandwiches.
Danish Butter Cookies (Melt in your mouth)
These melt-in-your-mouth Danish butter cookies are synonymous with nostalgia and the holiday season. These simple and delicious butter cookies are perfect for gifting this year!
Timing
Recipe Details
Ingredients
- 01 1 cup European salted butter ((227 g) (room temperature))
- 02 1/2 cup granulated sugar ((100 g))
- 03 1/8 teaspoon salt
- 04 2 egg yolks
- 05 2 teaspoons vanilla extract ((10 g))
- 06 1 tablespoon whole milk ((15 g) (or more to soften))
- 07 2 cups all-purpose flour ((220 g))
- 08 1/2 cup cake flour ((50 g))
- 09 coarse sugar ((for decorating))
Instructions
Make space in the refrigerator and prep the baking mats. Make room in your refrigerator for a baking sheet so the shaped cookies can chill for 20-30 minutes. Without chilling, the piped cookies may over-spread. Line two baking sheets with parchment paper or a silicone baking mat. Set aside.
Cream butter, sugar salt. In the bowl of a stand mixer fitted with a paddle attachment, cream butter on medium speed until smooth. With the mixer still running on low, slowly add in sugar and salt. Mix on medium speed until light and fluffy.
Incorporate egg yolks, vanilla, and milk. While mixing, add egg yolks, vanilla, and milk. Continue to mix on medium speed until well combined. Scrape down the sides of the bowl for thorough mixing.
Mix dry ingredients and add into mixture. In a medium-sized mixing bowl, whisk the flour, and cake flour. Add flour mixture to mixer in two additions, and scrape down the sides of the bowl. Mix on low speed until combined and no traces of flour. If the batter is too thick to pipe, add another tablespoon of milk to soften.
Pipe the cookies. Transfer cookie batter to a large piping bag with fitted a ½-inch open star tip. Pipe 2-inch cookies (rosettes, pretzels, circles, squares) on a prepared baking sheet. Space cookies at least 2-inches apart. If desired, sprinkle the dough with festive sprinkles and/or coarse sugar. Chill in the refrigerator for 20-30 minutes.
Prepare the oven. Preheat oven to 350°F. Make sure the baking rack is in the middle of the oven.
Bake. Bake for 10-15 minutes or until the edges are JUST lightly golden brown. Let cookies cool on the baking sheet for about 5 minutes before transferring to a wire rack to cool to room temperature.
FILED UNDER:
NUTRITION FACTS (PER SERVING)
Nutrition information is calculated using an ingredient database and should be considered an estimate. In cases where multiple ingredient alternatives are given, the first listed is calculated for nutrition. Garnishes and optional ingredients are not included.
Frequently Asked Questions About Danish Butter Cookies
Can I make Danish Butter Cookies ahead of time?
Absolutely, you can prepare the dough up to two days in advance and chill it in the fridge, or freeze logs for up to a month. Just thaw slightly before piping and baking your Danish Butter Cookies. This makes them ideal for holiday prep without last-minute stress.
How long does Danish Butter Cookies last in the fridge?
While best at room temp, Danish Butter Cookies can stay fresh in the fridge for about a week in an airtight container. The cold might firm them up, so let them sit out for 10 minutes before enjoying. Freezing is better for longer storage to maintain texture.
Are Danish Butter Cookies gluten-free?
Traditionally no, but you can easily adapt by using a gluten-free flour blend—I’ve done it successfully with no loss in flavor or tenderness. Check for certified blends to avoid cross-contamination. It’s a great option for inclusive baking.
What’s the best way to pipe Danish Butter Cookies?
Use a large star tip on your piping bag for those pretty swirls; hold at a 90-degree angle and squeeze steadily. If you’re new to it, check out our stained glass cookies recipe for piping tips that apply here. Practice makes perfect, and your Danish Butter Cookies will look bakery-fresh.
Can I add flavors to Danish Butter Cookies?
Yes, incorporate lemon zest or cardamom for a unique twist—they elevate the classic without overpowering. Start with small amounts and taste the dough. It’s fun experimenting while keeping the buttery essence intact.
Why are my Danish Butter Cookies spreading too much?
Usually due to warm butter or over-measuring flour; ensure ingredients are at the right temp and spoon-fluff your flour. Chilling the piped Danish Butter Cookies for 15 minutes before baking helps them hold shape. Adjust next time for spot-on results.
How many calories in one Danish Butter Cookies?
A standard cookie clocks in around 80-100 calories, depending on size—mostly from the butter. They’re worth every bite as a treat, but portion wisely. For lighter versions, reduce sugar slightly without sacrificing taste.
Can vegans make Danish Butter Cookies?
Swap butter for plant-based alternatives like coconut oil and use a flax egg; the results are surprisingly close. I’ve tested it for friends, and it works well. Your vegan Danish Butter Cookies will still delight everyone at the table.
Final Thoughts
Baking these Danish Butter Cookies has become my favorite way to spread joy, whether sharing with loved ones or savoring solo with a book. From the first creamy bite to the last crumb, they capture simple perfection that warms the heart. I encourage you to roll up your sleeves and give this recipe a go—your kitchen will smell amazing, and the results will have you coming back for more. Happy baking!